


Have you ever captured a stunning scene, a golden sunset or a subject bathed in morning light, only for your camera to deliver flat, uninspired results? Direct sunlight often feels like an obstacle, stripping images of detail and dimension. But what if you could transform these challenging lighting conditions into a powerful creative advantage?
This guide will show you how to master backlight photography, a technique that turns strong light into a captivating asset. You'll learn to capture dramatic rim light, create luminous glows, and craft powerful silhouettes that add depth and emotion to your images.
Are you wondering how to avoid dull, underexposed subjects when shooting into the sun? What camera settings create that perfect backlit glow? Or how to consistently produce captivating rim light effects in your portraits and scenes? This guide provides the answers. Prepare to elevate your photography and see challenging light as an opportunity to create truly unique visuals.
What is Backlight Photography and Why Use It?
Backlight photography isn't about fighting strong light; it's about harnessing it. This technique involves strategically placing your subject between your camera and the primary light source, typically the sun. Instead of illuminating your subject from the front, the light strikes them from behind, creating a distinct visual effect. Unlike frontlighting, which tends to flatten subjects and reduce depth by evenly illuminating them, backlighting transforms harsh light into a creative advantage for photographers of all levels, including smartphone users.
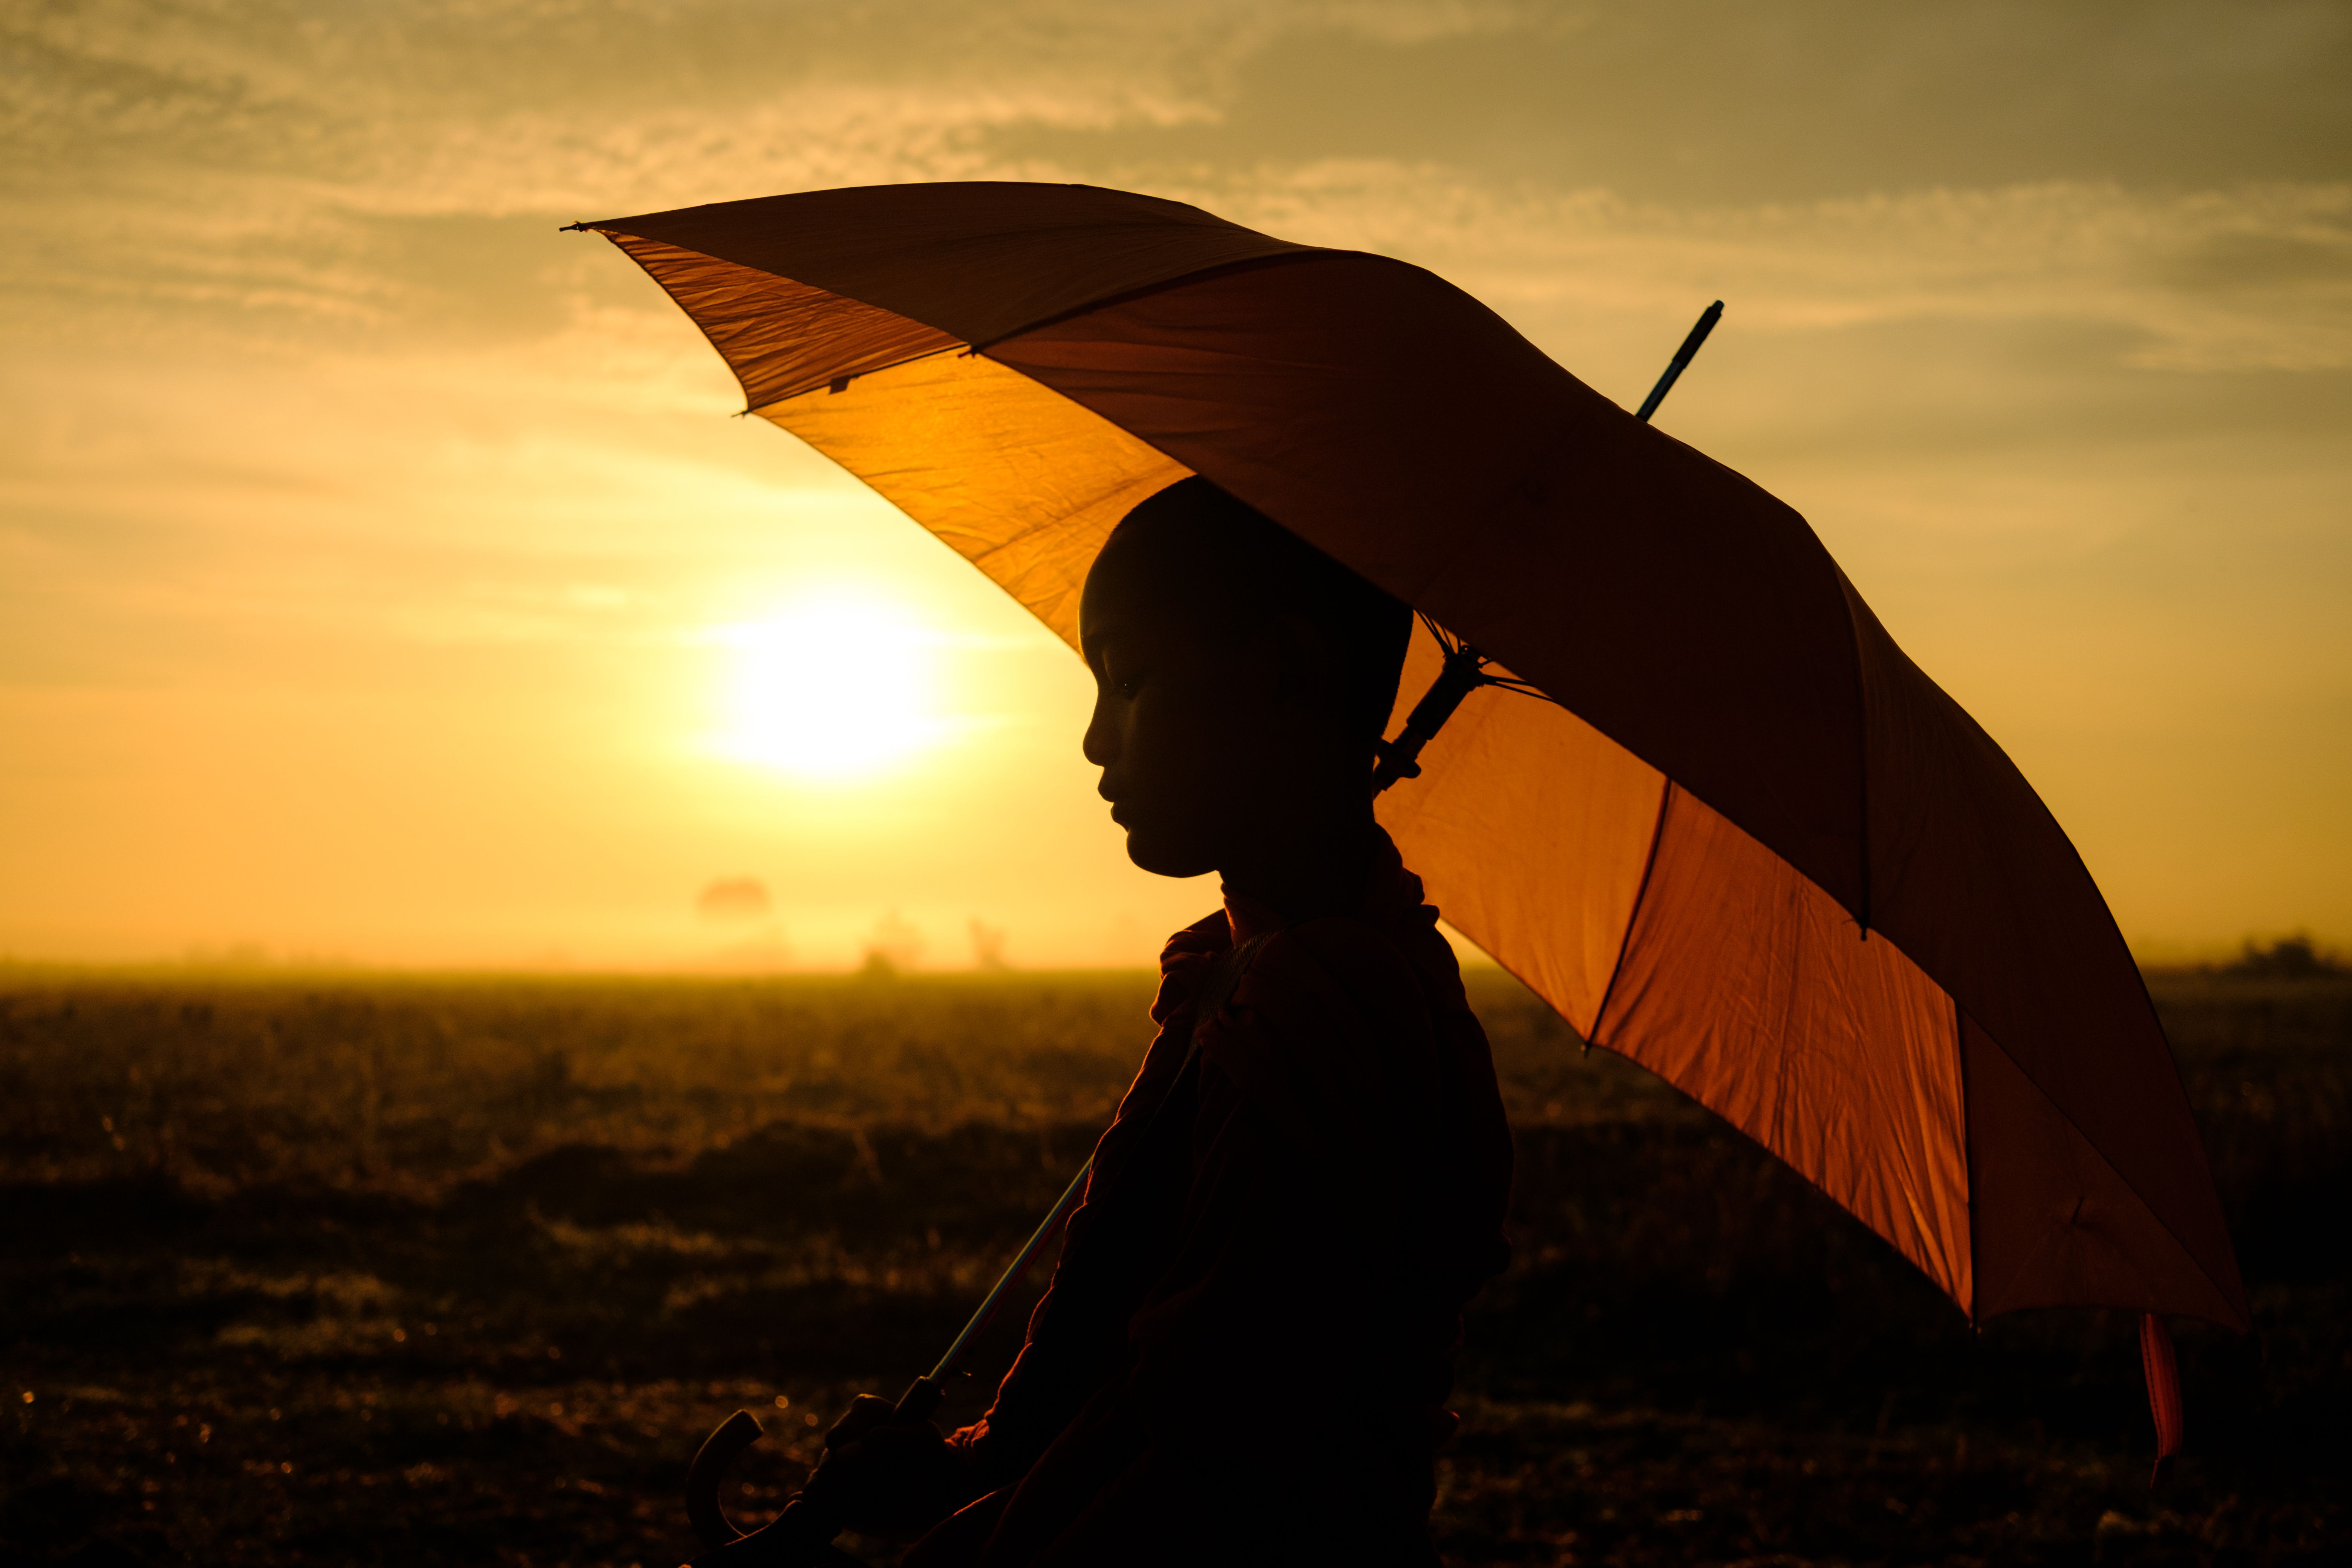
This approach excels at sculpting subjects. The light defines their edges with a brilliant glow (often called rim light), immediately separating them from the background. This luminous outline adds significant depth and a striking three-dimensional quality to your images. Beyond rim light, backlight photography also creates striking silhouettes, transforming subjects into compelling dark shapes against a brighter, often vibrant, backdrop. This introduces an element of mystery and drama, allowing you to focus on form and emotion rather than intricate details. It's an accessible technique that elevates storytelling, making it easier to capture captivating, mood-rich visual narratives, even for beginners learning how to shoot backlit photos.
Mastering Exposure for Stunning Backlight Photography
Capturing stunning images in backlight photography requires careful exposure management. When the light source is behind your subject, automatic metering often misinterprets the scene, overexposing the background and underexposing your subject. To counteract this, use spot metering. This precise mode measures light from a small, specific area, allowing you to aim directly at your subject. This helps prevent blown highlights and ensures your subject is properly exposed.
Shooting in RAW format is another essential technique. RAW files capture a wider dynamic range than JPEGs, preserving details in both bright highlights and deep shadows. This provides greater flexibility in post-processing, allowing you to recover lost information and fine-tune exposure without sacrificing image quality, a significant advantage for the high contrast often found in backlight photography. Cameras like Insta360 Ace Pro 2, with its 1/1.3" sensor and Dual AI Chip, enhance this capability by capturing light variations with impressive fidelity and vibrant colors, making it easier to achieve stunning results even in challenging backlit scenes.
Finally, utilize exposure compensation. If your subject appears too dark, apply positive exposure compensation (+0.3 to +1.0 EV) to brighten it, while carefully monitoring highlights to avoid overexposure. Conversely, a slight negative compensation can help manage an overly bright background. These backlighting techniques offer creative control over light and shadow in challenging scenes, transforming potential issues into artistic opportunities.
Creative Techniques in Backlight Photography: Glow, Rim Light & Silhouettes
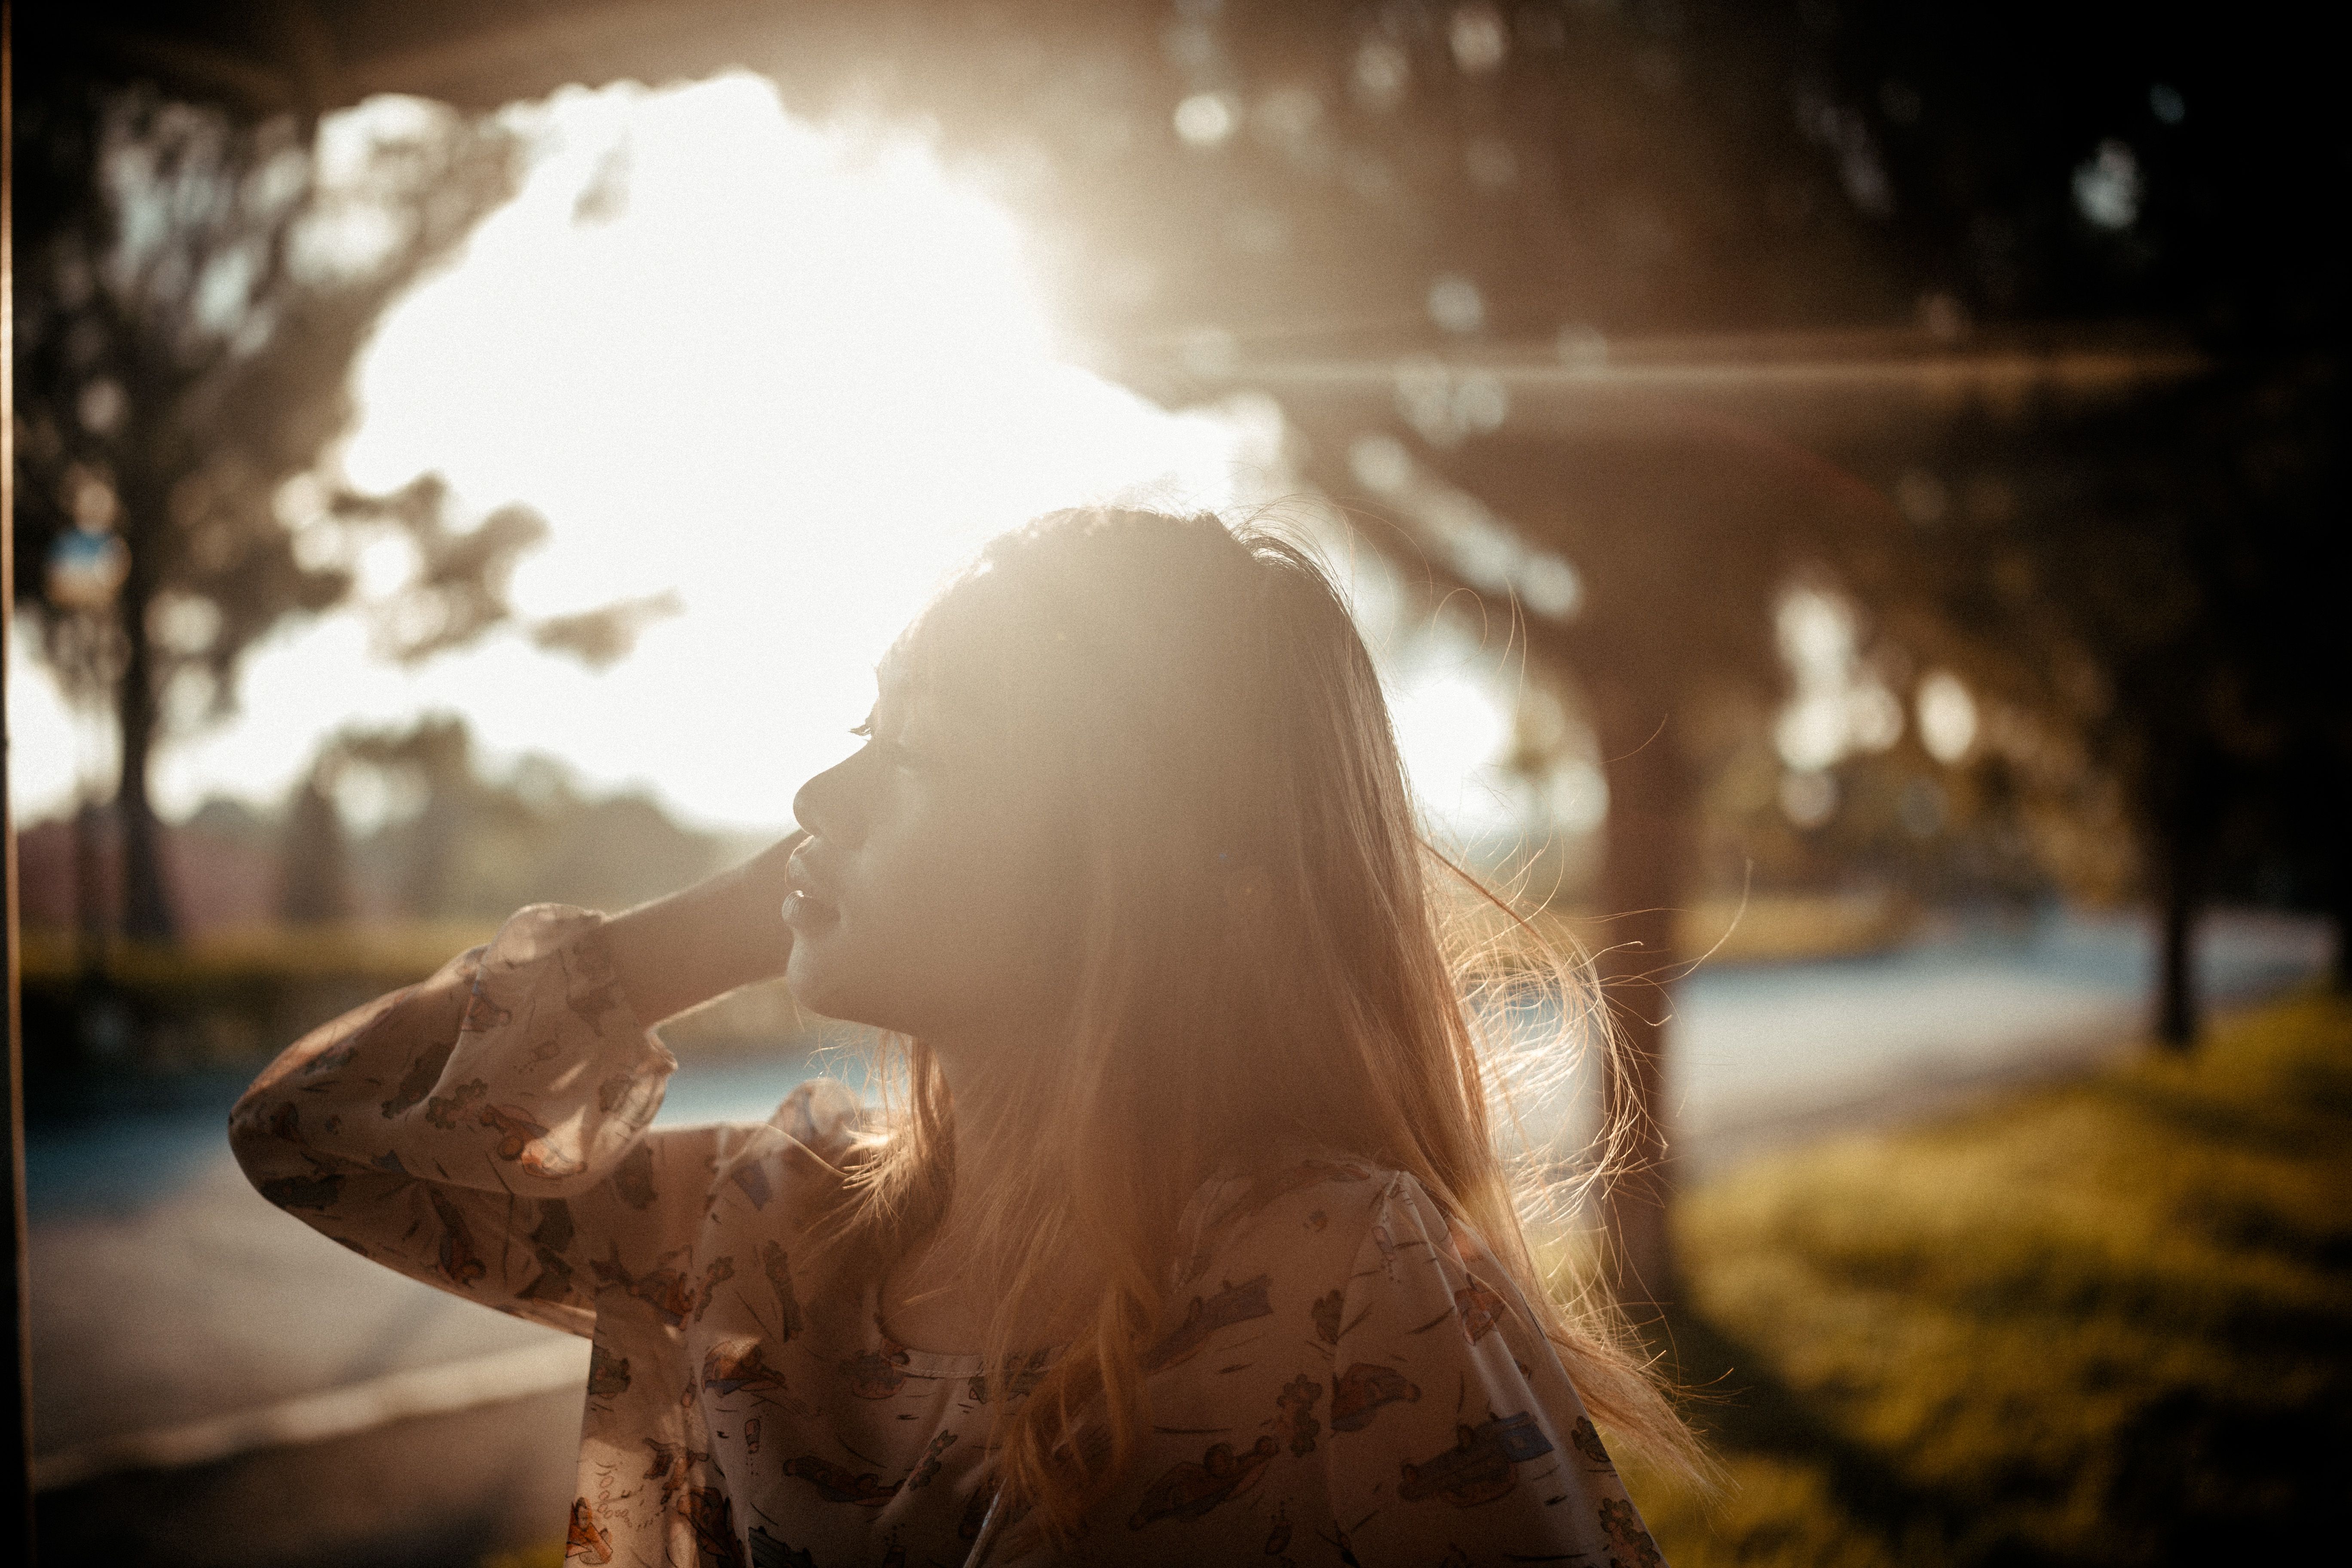
Effective backlight photography relies on creating a captivating glow and distinct rim light. Achieving this radiant outline requires strategic subject positioning. Position your subject so the light source, typically the sun, is directly behind them or slightly to one side. This creates a halo of light that defines their form, separating them from the background with stunning clarity. This technique excels in portraits, especially during golden hour, when the sun's low angle enhances the light's warmth and softness. Encourage your subject to move, allowing the light to catch their hair or clothing and intensify the glow. Translucent elements like fabric or leaves appear luminous when backlit, adding a magical quality. Experiment with different angles and distances to control the glow's intensity. Mastering this balance creates images with unique luminosity and depth. These backlighting techniques are fundamental for adding drama and depth to your photos.

Beyond creating a glow, backlight photography also offers dramatic silhouettes. To create a striking silhouette, intentionally underexpose your shot. Expose for the bright background, making your subject a bold, dark shape against the luminous backdrop. Position your subject to create a clear, recognizable outline, such as a distinct human figure or tree branch. Then, meter for the brightest part of the sky. This casts your foreground subject into shadow, transforming it into a compelling element of pure form that adds mystery and impact. These creative backlighting techniques can elevate your storytelling, making your backlit photos more rewarding.
Optimizing Your Backlight Photography: Timing, Positioning & Gear
To master backlight photography, focus on strategic timing, precise positioning, and the right gear. The "golden hour"—just after sunrise and before sunset—is ideal. During this time, the sun is low, casting a soft, warm, and diffuse light that is perfect for backlit images. This low, gentle light is more forgiving than harsh midday sun, simplifying exposure and minimizing harsh contrasts. It offers a wider dynamic range, allowing you to focus on creative composition rather than battling the light. The result: stunning golden hour portraits with beautiful rim lighting and luminous glow effects.
Beyond timing, thoughtful subject positioning is crucial. Position your subject to leverage the light for dramatic effect, allowing the sun to highlight their edges with a captivating glow. Consider using natural reflectors, such as light-colored walls or sand, to subtly bounce light back onto your subject. This lifts shadows without diminishing the backlit effect. A crucial piece of gear is a lens hood. It prevents unwanted lens flare and maintains contrast when shooting towards the sun. For creative freedom in diverse lighting, a camera like Insta360 X4 excels. Its 360° capture allows you to "shoot first, frame later," which helps you achieve the perfect composition in challenging backlit scenes. This capability transforms challenging lighting situations into extraordinary images, simplifying how to shoot backlit photos.
Post-Processing Your Backlight Photography for Maximum Impact
Post-processing is crucial for backlight photography, allowing you to refine and enhance the dramatic effects captured in-camera. Backlit scenes often feature high contrast, so careful adjustments can significantly improve your results. Begin by recovering details in both shadows and highlights. Modern editing software allows you to gently lift darker areas to reveal detail in your subject, while subtly recovering blown-out highlights in the background. This balances the image without sacrificing its natural feel.
Next, fine-tune your contrast and white balance. Increasing contrast can deepen shadows and brighten highlights, making your rim light pop and giving silhouettes more definition. Adjusting white balance helps preserve the warm, golden tones often associated with backlit shots, or cool them down for a different mood. Finally, consider adding a touch of sharpening to your subject and perhaps a slight vignette to draw the eye towards your main focus. These steps transform a good backlit shot into a compelling image, enhancing the unique luminosity and emotional depth of your backlight photography.
Backlight Photography for Specific Subjects: Portraits, Nature & More
Backlight photography offers versatile applications, transforming various subjects with dramatic flair. For portraits, especially during golden hour, backlighting is transformative. When the sun is behind your subject, it creates a desirable rim light effect, outlining hair and shoulders with a luminous glow that adds a dreamlike quality. Encourage movement and candid expressions; the light beautifully highlights these dynamic elements. Experiment with partial backlighting to highlight facial features while maintaining the glow, adding depth and emotion.
In nature photography, backlighting transforms ordinary scenes into captivating visuals. Imagine leaves glowing translucent green, or water shimmering with dazzling sparkle. Flowers take on an ethereal quality, their petals illuminated from within. This technique is also excellent for silhouette photography with wildlife, capturing dramatic shapes against vibrant skies. Whether for a sprawling landscape or a delicate macro shot, understanding how to shoot backlit photos lets you leverage natural light to infuse your images with depth and artistry, elevating your creative content.
Conclusion: Elevate Your Photos with Backlight Photography
Mastering backlight photography transforms challenging light into captivating art. We've covered essential techniques: precise exposure control with spot metering and RAW capture; using the sun for luminous rim light and dramatic silhouettes; and optimizing shots with the right timing and gear, such as shooting during golden hour and using a lens hood. Post-processing then refines these elements, revealing the full potential of your backlit images.
Now, it's time to put these backlighting techniques into action. Don't avoid shooting into the sun; embrace it as a powerful creative tool. Grab your camera, seek out inspiring light, and start experimenting. This will elevate your photography, helping you consistently create stunning, emotionally rich visuals and master your use of light.
FAQ: Common Questions About Backlight Photography
What is backlight photography?
Backlight photography is a technique in which the main light source is positioned behind the subject. It can create glow, rim light, silhouettes, and a stronger sense of depth.
How do I avoid blown highlights in backlight photography?
Lower your exposure slightly, hide the sun behind your subject, shoot during golden hour, or recompose so the brightest area is less dominant. Shooting in RAW also gives you more editing flexibility.
Why is my subject so dark in backlit photos?
Your camera is probably exposed to a bright background. Tap or meter on the subject, use exposure compensation, or add fill light with a reflector or nearby bright surface.
When is the best time to shoot backlight photography?
Golden hour is usually best because the sun is low, warm, and softer. It is easier to create rim light and glow without harsh contrast.
Can I shoot backlight photography with a smartphone?
Yes. Tap your subject to control exposure, manually adjust brightness if needed, and use HDR or RAW mode when the scene has strong contrast.


%20(1).svg)
%20(1).svg)
.svg)


